

Effectively Managing Shopify Inventory

When running Timber Kids, I kept Shopify stock accurate by tracking each variant at each location - and using available stock to decide when to reorder. My starting point: one SKU per variant, quantity tracking switched on and out-of-stock selling turned off unless I was taking pre-orders.
I focused on four checks:
- Know the stock states: separate what’s ready to sell, reserved, damaged, physically held or still incoming.
- Match records to physical stock: count by SKU and location, check differences and record receipts, transfers and adjustments.
- Order before stock runs out: use daily sales × supplier lead time + safety stock, then check incoming orders and cash flow.
- Keep a routine: check fast movers daily, review replenishment weekly and update reorder points monthly.
The key distinction? On-hand stock isn’t all sellable stock. I compare physical counts with on-hand quantities, but base low-stock alerts on available quantities.
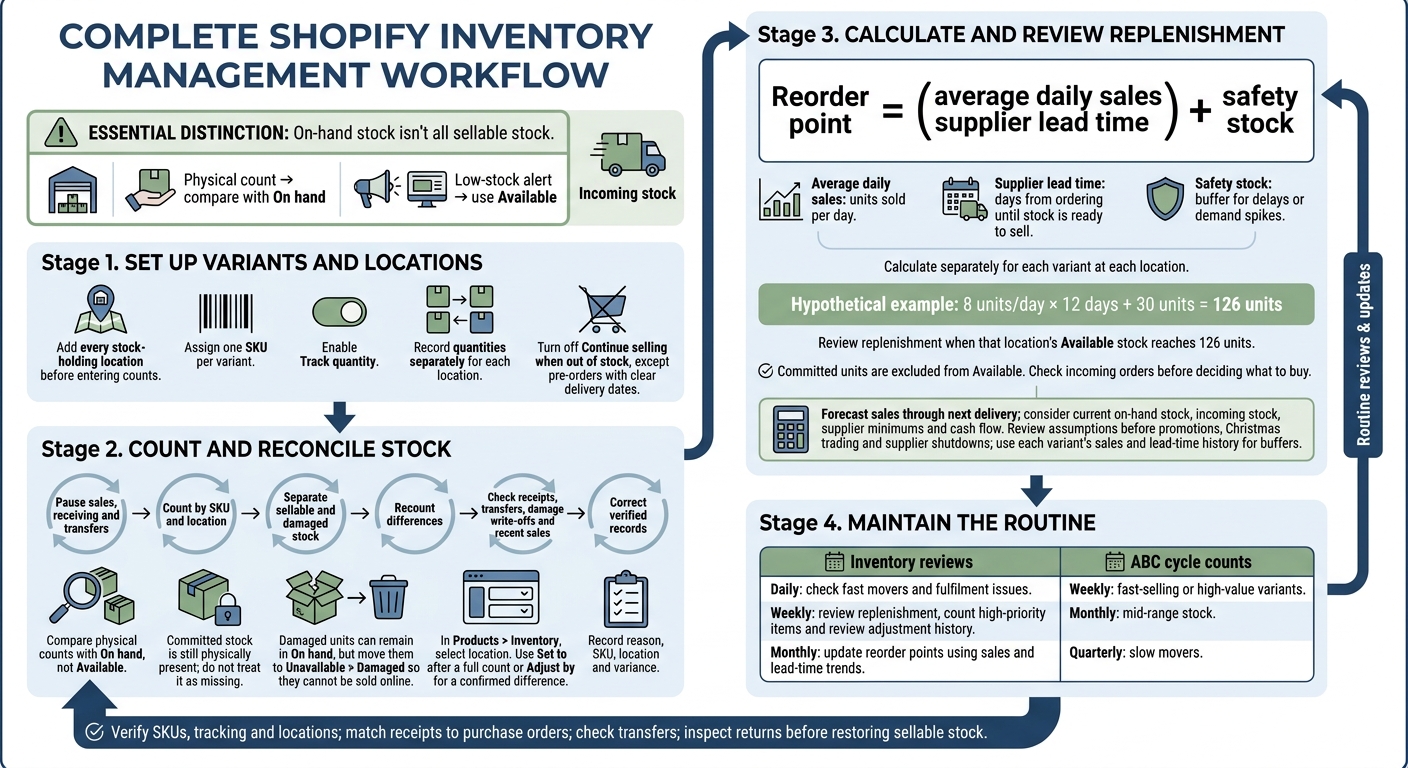
Shopify Inventory Management Workflow
Shopify Inventory Management Tutorial: How to Manage Inventory in Shopify
sbb-itb-a0ae8a5
Set up variants, SKUs and stock locations
With stock states defined, map each product to a variant, SKU and location.
Add locations before entering stock counts. In Shopify admin, go to Settings > Locations and add every warehouse, shop or pop-up that holds stock. Shopify records inventory against these locations.
Assign SKUs and turn on quantity tracking
Create one stock record for each variant, with one SKU per variant. In Products, add options such as size, colour or material, then give every variant its own SKU and barcode. Before importing CSV files, fix duplicate SKUs, inconsistent variant names and mismatched counts.
Next, open each stock-controlled variant’s Inventory section and enable Track quantity before entering counts.
Record stock by location and track movements
Record stock quantities separately for each site. Location-specific counts matter: a central total can hide shortages at individual sites.
When moving units between locations, use Products > Transfers rather than manually editing counts. Accept the transfer at the destination to record the movement.
Check which Shopify plans and locations can fulfil online orders, then set your fulfilment priority accordingly.
Check settings to prevent overselling
Review each variant’s inventory settings. Turn off Continue selling when out of stock for items that must stop selling at zero available units. Use this setting only for pre-orders with clear delivery dates.
Check physical stock and record adjustments
Once SKUs and locations are mapped, compare Shopify records with a physical count at each location. Verify the counts before updating Shopify, then use the corrected records to set reorder points.
- Pause stock movements. Schedule the stocktake during quiet hours or after close. Pause sales, receiving and transfers while staff count.
- Group stock by SKU and location. Put similar items together, face labels outward and assign staff to count each SKU separately at each location. Committed stock is still physically present, so don’t record it as missing.
- Separate sellable and damaged stock. Record these quantities separately. Damaged units can remain in On hand, but move them to Unavailable > Damaged so they can’t be sold online.
- Recount differences. Check any mismatches again. Compare the physical total with Shopify’s On hand quantity - not Available.
Correct stock records in Shopify Inventory
Go to Products > Inventory and select the location. Use Set to after a full count, or Adjust by for a confirmed difference.
Add the correct reason code and record the SKU, location and variance. Limit adjustment access to trusted staff.
Find count errors and schedule cycle counts
Before adjusting a record, check receipts, transfers, damage write-offs and recent sales to find what caused the difference.
Use ABC cycle counts: count fast-selling or high-value variants weekly, mid-range stock monthly and slow movers quarterly. Cover the rest of the catalogue with broader stocktakes, and review adjustment history weekly to spot repeated errors.
Set reorder points using demand and lead times
Use your corrected on-hand counts to set a reorder point for each variant at each location.
Calculate when to reorder
Reorder point = (average daily sales × supplier lead time) + safety stock.
Average daily sales means units sold per day. Supplier lead time is the number of days from placing an order to having stock ready to sell. Safety stock is your buffer for delays or spikes in demand.
Apply this formula separately to each variant and location.
Hypothetical example: A black, medium variant sells eight units per day, takes 12 days to replenish and has a 30-unit buffer. Its reorder point is (8 × 12) + 30 = 126 units. Review replenishment when that location’s Available stock reaches 126. Committed units are excluded from Available, and incoming stock should be factored into the replenishment decision.
Plan purchase quantities around sales and cash flow
When a variant reaches its reorder point, forecast sales through to the next delivery. Then work out how much to order based on current on-hand stock, incoming stock, supplier minimums and cash flow.
Check your demand and lead-time assumptions before promotions, Christmas trading and known supplier shutdowns. Set buffers using each variant’s sales and lead-time history, rather than applying a flat percentage across the range.
Review these thresholds during scheduled stock checks and after promotions, peak periods or supplier delays. This helps prevent stockouts without buying more than you need.
Keep a consistent inventory routine
Once you’ve set your SKUs, counts and reorder points, stick to a regular routine. Check stock, correct differences and review replenishment needs so you can keep products available without buying too much.
Schedule stock reviews
Daily, check fast-moving products and fulfilment issues. Weekly, review replenishment needs and count high-priority items. Monthly, update reorder points based on sales and lead-time trends.
Use Shopify reports such as Days of inventory remaining and Inventory turnover ratio, alongside adjustment history, to spot slow-moving stock and count errors. Set low-stock alerts so you can act before fast movers run out.
Use an inventory checklist
A short weekly checklist helps keep your records in line with physical stock. Check that each variant has one SKU, stock tracking is on and locations are correct. Match received stock against purchase orders, check transfer records and inspect returns for resale condition.
Include cycle counts, stock adjustments with clear reasons and reorder reviews. Only return stock to sellable inventory after checking its condition.
FAQs
Why am I still overselling with stock tracking enabled?
Your Shopify records may show more stock than you actually have. Manual counting errors, damage that hasn’t been recorded, theft or shrinkage can all cause this gap. Separate systems across sales channels or marketplaces can also leave stock levels out of sync.
Run regular cycle counts to check physical stock against your Shopify records and correct any differences. Make sure all sales channels are fully integrated so you have one source of truth for stock levels.
How do I set safety stock for seasonal products?
Analyse past sales to spot seasonal demand spikes. Calculate reorder points by multiplying supplier lead times by a safety factor. Set higher thresholds during peak seasons and lower them in slower months. Keep a 10% to 15% safety buffer for fast-selling or high-margin items.
Use Shopify inventory adjustments to mark this buffer as unavailable stock. Automate low-stock alerts with Shopify Flow so you can replenish stock before seasonal shortages hit.
When should I transfer stock rather than reorder?
Transfer stock when your local store is running low but another store, warehouse or fulfilment centre has units available to sell. A transfer moves inventory between locations. Stock becomes available at the destination only after it physically arrives and is received.
Reorder stock when total inventory across all locations falls below your reorder point. That point is based on average daily sales, supplier lead time and safety stock. Reordering adds supply rather than moving existing stock between locations.

